
220 - 240V AC 360 grader - 360 grader
LACK OF PROJECTOR FILE – projector use in sewing is fairly new and not all patterns include a projector file. If an A0 with layers is included then this can normally be used. However, as it becomes more popular I think more designers will offer a separate projector file.
Pattern projectorapp
Wow I’ve been around the sewing block a few times but this is new to me, and very intriguing! Thanks for a great article.
Thank you for sharing. I joined the facebook group a few weeks ago but got overwhelmed. Your blog post is one of the most clearly written that I’ve found and now I think I’m ready to dive in and decide exactly what will work for my space.
OPTIMAL LAYOUT – you no longer have all the pattern pieces available to lay out on the fabric prior to cutting. This can make it harder to optimise your layout and save fabric. I think it can be overcome with a little planning though.
Blackfly GigE. The Blackfly® camera line combines Sony, Aptina, and e2v sensors with a host of unique features. For FLIR area scan cameras with the ...
Un'altra classificazione degli obiettivi, riguarda la differenza tra quelli a focale fissa e quelli a focale variabile; questi ultimi, sono comunemente detti ...
The total cost for my set up was around £150. You could get everything for around £120 as I write today but prices can vary a lot depending on when you buy.
Bestpattern projector
Mini Spotlight - Flush mounted - 40° - AC 230V - White. Ref.: L&D-Mini Spot-40°-AC230V. L&D. Availability: In Stock Out of stock. Special Price: 34.80 €.
YOUR CUTTING SPACE – do you have a permanent space set up where you will be able to mount your projector or will it need to be put away? Are you allowed to drill in to the wall to add the mount? If not, you will need to find an alterative set up.
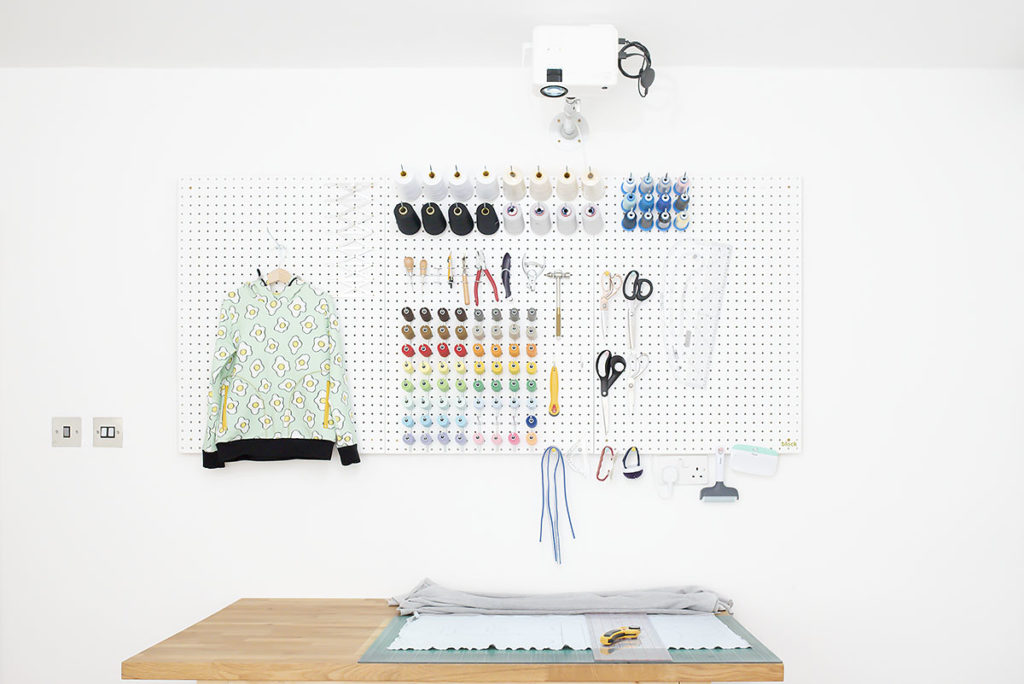
I am sharing my set up as it helped me to see what other people were using (and all the extra things that were required). Please keep in mind that this might not be the best set up for you though. I chose an Apeman 4800 which is no longer listed but this Apeman 4500 is very similar (and costs less than I paid). One reason I chose this brand over other very similar models is the ‘FLIP’ button on the remote (two below the green button in the photo below). This will flip the image for me so I can quickly rearrange the pattern pieces horizonally or vertically (or both). This is an improvement than the ‘rotate view’ option in Adobe Reader and also saves me a trip back to the computer.
COST SAVINGS – after the initial investment, you will save money on printer paper and ink. These things can add up quickly if you sew a lot of different patterns and sizes.
PATTERN MAKING – I have already saved time in developing sewing patterns, as I can also project straight from Inkscape, without having to create the pdf. I can also check adjustments in seconds.
This is an exciting opportunity to join an industry leading lighting design company! ... Sign Production & LED Lighting Assembly. at Major Graphic Signs PL. This ...
There are some practical limits to using the projector. I have included these issues to make you aware but I wouldn’t let them put you off getting a projector. If you’re aware of them before you even purchase your projector though, it can help guide your decision.
NATIVE RESOLUTION – this is the best resolution your projector can display, even if the file you are projecting has a higher resolution. A higher native resolution is better, especially if you think you might also use your projector for movies.
Polychromatisches Licht ist Licht (sichtbar und unsichtbar), das aus vielen verschiedenen Wellenlängen besteht. Beispielsweise ist das weiße Licht einer Halogenlichtquelle polychromatisch und enthält alle Wellenlängen zwischen ca. 360 bis 2500 nm. Auch das Licht von Weißlicht-LEDs und von lasergepumpten Plasmalichtquellen ist polychromatisch. Aus polychromatischem Licht kann in einem Monochromator monochromatisches Licht, also Licht mit nur einer Wellenlänge, isoliert werden.
Halogenlichtquellen, Weißlicht-LEDs oder lasgergepumpte Plasmalichtquellen sind Beispiele für polychromatische Lichtquellen.
There are other additional features to look at such as WiFi and remote controls. There are even some interactive projectors with a pen. It is worth taking your time to read the descriptions carefully when purchasing a projector.
HOW YOU PLAN TO PROJECT – if you wish to project wirelessly you will need to select one with that feature, or with the option to add a Chromecast.
Polychromatisches Licht besteht aus vielen Wellenlängen, monochromatisches Licht nur aus theoretisch einer einzigen Wellenlänge.
THROW RATIO – I’m actually starting with the only feature not mentioned in the descripton but it’s an important one. I think a very low throw ratio would be the best reason to increase the amount you spend for most people.
TRACING ON TO FABRIC – if you want to use fabric pens to draw on your pattern pieces, this makes it a lot easier to copy a design.
NOISE – some projectors can be noisy when they are on. I don’t find it a big problem but it might be distracting if I wanted to make a video while it was on.
In order to explain throw ratio, we first need to know that the throw distance is the distance between your cutting area and where the lens of the projector will be.
Dittopattern Projector
2020731 — A focal length is the distance between the upper surface of substrate and the bottom of the lens, and the height will depend on what you're ...
I’ve mentioned some great resources already in this post. I’ve included them again here, as well as links to some YouTube videos and blog posts.
The meaning of OPTICAL GLASS is flint or crown glass of well-defined characteristics used especially for making lenses.
BUDGET – projector prices can start from around £70 and go all the way up to over £1000. It can be difficult to know if spending more will give you significantly improved results.
Epsonpattern projector

Dittopattern Projectorreview
Hi Marcy, I’m only cutting one piece at a time but some pieces won’t fit within my projected area. This depends who you’re sewing for and what you’re making but would apply for most long dresses or trousers, especially for bigger children or adults. There are tricks to get around this but it would make it easier if I could make use of the full size of my cutting table. Hope that helps.
COST – The final factor is the initial cost. This is not a possibility for many. However, if you sew frequently and often print out new patterns, then factor in the cost of paper and ink to decide if it’s worth the investment. If you have a sewing business you can also factor in the cost of your time.
Dittopattern projectoralternative
Ideally the surface you are projecting onto will be perfectly flat and level. It can be very difficult to calibrate otherwise.
201975 — Title: Oblique Light. About the Photo: The International Forum is a photogenic architecture. The light coming in varies with time, and there ...
24 — Hallo miteinander,Betreibt hier jemand einen sogenannten Beamer über einen Umlenk/Oberflächenspiegel?Mein Problem ist das er mit 120Hz beim ...
The first thing you should know about buying a projector is that there isn’t a ‘one size fits all’ solution. There are many different factors to consider when making your choice. Also, there is an initial investment in both money and time but it will save you so much of both once you’ve got it all set up.
Have you heard about the newest development in sewing patterns? What would you say if I told you that you can still get the benefit of instant downloads of your favourite pdf patterns, without the tedious job of assembling the pieces? Imagine that printing your pattern out, taping the pages together and then cutting (or even tracing and then cutting) your paper pattern pieces out is no longer required. Sounds too good to believe doesn’t it? Well, that is actually a reality with projectors. You don’t need a projector that is designed specifically for sewing either, many people have successfully set up a cutting space at home, using a standard movie projector. Once you’ve tried it, you’ll never want to go back. I already can’t imagine being without mine.
I have a second projector post explaining the how to use pdf sewing patterns once you’ve bought a projector, and a few tips I’ve picked up while cutting my fabric.
LUMENS – this is a measure of the brightness of the light from the projector. The higher the lumens (or lux), the brighter the projection will be. This is important if you are cutting your fabric in a bright room. The projector in the description above states 5000 Lumen. The lumen figures given for cheaper projectors are often exaggerated though.
This is so great. You mentioned that if you had a larger cutting area you’d want a smaller throw projector. I have a huge cutting table but generally only cut out one piece at a time, so what would be the reason for you to be able to project an even larger image?
I also have this adjustable mount and a Chromecast to be able to connect wirelessly. I then open the pdf on my laptop, using the chrome browser. I’ll talk about this in my next projector post, and included a video to help. Finally, I got a slightly longer cord so that I could hide it behind my pegboard.
For many this will be a traditional wall or ceiling mount designed for projectors, as show above. However, for those who are unable to drill into the wall, I have seen some creative solutions, such as mounting on a tall piece of wood, that can be brought out for fabric cutting. Alteratively, a boom stand can be used with a counterweight to make sure your projector is securely supported.
Pattern projectorsoftware
YOUR LOCATION – this will affect what projectors are available to you locally. One of my preferred options was not available in the UK. There is the option to have one shipped but that can be very costly, and makes returns difficult if you have any issues.
POWER SOURCE – some projectors are plugged into the mains, while others are battery operated. There are pros and cons to both of these. If you have a permanent set up then having your projector plugged will be best, as you may knock it out of calibration every time you recharge the battery. For a temporary set up, battery power reduces the wires you will need have around your machine.
As part of this the calibration process you will find out a zoom percentage to input into Adobe Reader. This will be unique to your set up. It may vary slightly for different sewing patterns but is a good starting point. Whenever I opena file I check a 10cm grid layer against my cutting mat. Once I’m happy I turn this layer off.
I have a throw distance of 137cm, and the usable projected area is 85cm wide. This means my projector has a throw ratio of around 1.6. If I ever get a larger cutting mat I may look into buying an ultra low throw projector but I’m very happy with this set up for now.
As you look at projectors you will see long descriptions like this “Projector APEMAN 5000 Lumen Mini Portable Projector 1080P Support LED Projector 200″ LCD Home Cinema Projector 50000 Hrs LED Life, HDMI/VGA/AV/USB/Micro SD/TV Stick for Home Entertainment[Upgraded]”, so what exactly do these things mean?
PATTERN ADJUSTMENTS – it is usually fairly simple to blend between two or three sizes by selecting all of the layers required. Adding or reducing length is also quick and easy to do, by measuring on the fabric, then scrolling the pattern piece along. However, if you need to make more complicated pattern adjustments, such as a full bust adjustment, this can be more challenging. Also, how do you make sure you save them for when you use that pattern again?
PATTERN MARKINGS – I have seen a photo where someone used their projector to check the placement of a pocket, once the pocket was ready to sew on.
YOUR THROW DISTANCE – if it is very low then consider a projector with a very low throw ratio, such as an ultra low throw projector, otherwise your projected area will be very small. Many people find these for a reasonable price on Ebay.
ROOM DARKNESS – can room be made dark? If it can’t, you will need to choose one with higher lumens to be able to see the lines clearly.
If you do not have a WiFi projector, you will either need to connect with an HDMI cable or using a casting device, such as a Chromecast. If you are using an HDMI cable then consider how long you would need it to be, especially if your cutting table is a quite far from your computer.
Product Name: B4B-EH-A Through Hole 4 Pin Speaker Wire Connectors. Connector Product Type: Wafer/Header. Centerline (Pitch): 2.5 mm. Connector System: Wire-to- ...
Traditionally projectors are sold for use as a home cinema so you may want to use yours for that too. Many can also be used for presentations. I have also noticed that they are very popular with cookie makers.
This would either be your computer, laptop or mobile device. If you’re reading this then you probably have at least one of these already.
So that concludes my not so brief introduction to using projectors for sewing. Are you tempted to try it? If you want to find out how to use your projector once you’ve got it all set up, head straight over to my ‘Tips for using pdf sewing patterns on a projector’ post. It includes three videos to help, and I also share some of the tricks I’ve found.
Unfortunately many projectors do not provide the actual throw ratio. The calculation above is also slightly simplified as the aspect ratio will have an effect. There is a very useful throw distance calculator at Projector Central, if your projector model is included in their database. The ‘projectors for sewing‘ group is very useful for finding out the projected image size people able been able to achieve for various projectors.
LACK OF PORTABILITY – if you want to take some pattern pieces to a sewing event it’s probably not practical to take your projector with you. You can always project your pattern pieces onto paper and draw them on, or resort to the ‘old fashioned’ method of printing them out. It will make you appreciate your projector even more!
For the tiniest projectors, you can use a desk mount similar to those used for mobile phones or tablets. For ultra low throw projectors they often just sit on, or just to the side, of the cutting space. You may want to raise them a little bit, either on a shelf or by positioning it under some books.
STORAGE – you no longer need to worry about storing all your paper patterns, or worse, losing them and having to print them out again.
LARGE PATTERN PIECES – depending on your set up, your projected area may not be big enough to project the whole piece for larger pattern pieces. This can be still worked around.
For example, a throw ratio of 2.0 means that if your lens is 2m away from your cutting table, the width of the projected area will be 1m. If you have a smaller throw ratio of 0.5, your lens only needs to be 0.5m away from the cutting table for the width of your projected area to be 1m. Most people are trying to maximise the width of their projected area but not many people have ceilings that are 2m above their cutting table to mount their projectors on. Throw ratio is an important factor to achieve a reasonably sized projected area.
I am not going to cover how to calibrate because the ‘projectors for sewing’ group have a brilliant guide for that – just go to this post for the step by step guide and this post for an explanation of the calibration grid. The group admin are incredibly responsive to questions about troubleshooting as well.
Built-in light beam module to improve heat dissipation, circuit board collection protection design. Blue-violet Light Beam 1. Material: Aluminum.
I’ve mentioned calibrating a few times but what is it? It is making sure that the image you project onto your cutting surface is perfectly flat, not distorted in any way, and the correct size. The last point is not normally an issue when projecting movies but essential for sewing patterns. In the same way you check your 5cm or 2″ square when you print out a pattern, you need to make sure your projected pattern pieces are the right size. If you have a permanent set up then you should only need to calibrate once.
Freeprojectorsewing patterns
CALIBRATION ISSUES – this can take a bit of time and frustration. If you have your projector mounted up near the ceiling, it helps to have an extra person for this step.
SIZE OF CUTTING AREA – is there a limit on the size of your cutting area? If you use a cutting mat with a rotary cutter, then it makes sense to try and obtain a projected area that is a similar size to the cutting mat? The width my projected area is almost the full width of my cutting mat.
SIZE – projectors can vary significantly in size. My projector is somewhere in the middle. Some of the mini projectors are similar in size to a mobile phone, while some of the ultra short throw projectors are enormous. I imagined the popular Epson ones were the size of a polaroid camera. In fact they are around 37cm wide and high and 14cm deep!
TIME SAVING – I can’t emphasise this one enough. It gives me so much joy to skip the printing and taping stage. The bigger the pattern the more time you save.
After getting my first request for a projector file a couple of months ago, I joined the Facebook group Projectors for sewing. It’s a fantastic group with a lot of information in it and members who are happy to give advice. Every time I visit the group I find out another piece of information. It can be a bit overwhelming at first though. I spent several days obsessively reading as many different posts as I could, before deciding to commit to a projector for myself. I wanted to be able to test projector files, if I was going to offer them for Titchy Threads patterns. Now that I have started introducing projector files, and using them myself, I wanted to share some of the basics with you. If you want to skip to a particular section, just click on the heading.
KEYSTONE – this is an adjustment that some projectors have built in to reduce distortion from projecting onto an angled surface. You can see in the photo below that my projector is angled forwards, while my cutting table is flat. It is a useful feature when calibrating your monitor.


 Ms.Cici
 8618319014500